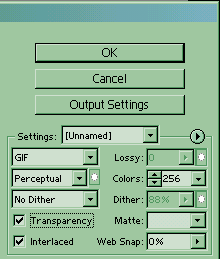
 Select "GIF" from the drop down menu. (In the image on the left, it is the menu above the one that says perceptual).
Optimizing A Graphic As A GIF
A lot of this tutorial will be repeat information from the "Optimizing A Photo As A JPEG" tutorial.
The .gif is a file type meant for animations, images that require transparency, and other images with less then 256 colors. A cartoon, piece of clip art, or a thumbnail of an image would best be saved as a .gif.
Remember that this tutorial was written in Photoshop 6.0, however it should still work in lower versions, and may also direct you in the right place if you use other graphics software.
Introduction
The GIF (Graphic Interchange Format) was first made in 1987, by CompuServe. An advantage of GIF is the ability to make it into an animation, or make it transparent. It's not ideal to save photographs as a .gif, as the GIF has no more then 256 colors.
The final file size of all images for the internet should be less then 30-40 K. This size usually maintains a resonable load time without sacrificeing quality. If you cannot get it under a 30-40 K, then you should consider chopping the image up. The same image chopped up into smaller pieces will load faster then if it is in one big clump anyway.
Interlace and Non-Interlaced
The difference between interlaced and non-interlaced is not quality, but more on how the GIF loads.
If you have a faster connection, then you can't really tell the difference, but on a slower computer the Non-Interlaced GIF loads a lot slower then the other.
This is because Non-Interlaced images load one line at a time, but the interlaced GIF fills in every other line of data, and then goes back for the missed ones.
Which one you use is a preference thing, and shouldn't effect the quality, but I tend to go with Interlaced.
Additional GIF Options
Dithering
Dithering creates the apperance of more colors and detail, but also increases the file size.
Percptual
This gives priority to colors that appear most commonly in the image, and more sensitive to the human eye.
Selective
creates a color table similar to perceptual, but favors broad areas of color and preservation of web safe colors.
Adaptive
Samples colors from portion of RGB spectrum that appear most commonly in the image.
Web
This setting consists of the 216 colors that are shared in common by the windows and Mac OS system palettes.
Custom
Preserves the current perceptual, selectie, or adaptive color table as a fixed palette that does not update with changes to the image.
Mac OS and Windows
Uses the computer systems's default 8-bit palette, which is based on a uniform sampling of RGB colors.
Transparency
Checking this box means that all parts of the image that are transparent will take on the color of the web page's background color.
Lossy
You can use alpha channels to optimize the amount of lossiness in a GIF image, white areas of the mask yield the highest quality, and black areas of the mask yield the lowest quality.
Colors
GIF options allow you to decide how many colors your image has. As long as you have a low file size, choosing 256 will allow you to have the maximum amount of colors.
Matte
With matting you can simulate transparency by filling or blending transparent pixels with a matte color. The matte color that you choose should be the same as the background color of the web page the image will be placed on. This prevents the edges of the image from looking "jagged". By default it is usally white.
Web Snap
You use this to automatically shift colors to the closest Web palette equivalents (and prevent the colors from dithering in a browser). A higher value shifts more color.
Saving For The Web
When you finally have your image ready to be saved, you should go to file > save for web (shortcut key: alt+shift+ctrl+s). This will bring up a new dialog box.
The screen that appers will give you a number of options. First, you should select the 2-up tab. This will allow you to compare the origenal file with the final version.
Select "GIF" from the drop down menu. (In the image on the left, it is the menu above the one that says perceptual).
In the next drop down menu, select which option would be best, and work your way through each option using the guide above. When you select the number of colors you will want to go with the most amount of colors you can get away with while still maintaing a resonable file size.
If you are working with transparancy, be sure to set your matte to the same color as the background that the image will be placed on.
When you are done you can press OK to save the file where you want it.
 Main?
Main?