 On the right side, near the middle of the dialog box you should see an option that says settings. Choose JPEG High (or any JPEG really).
Optimizing A Photo As A JPEG
When collecting images for your web site make sure that you only work with high quality images. If you start with a low quailty image, there really isn't much you can do to make it look better except reduce it's size.
The .jpeg (also known as .jpg) is a file type that should be reserved for photographs, high detail artwork, and anything that has well over 256 colors.
Remember that this tutorial was written in Photoshop 6.0, however it should still work in lower versions, and may also direct you in the right place if you use other graphics software.
Introduction
JPEG (Joint Photographic Experts Group) was created for compressing photographs, thus making the file sizes smaller and easier to transfer over the net. It's true that when compressing an image with the JPEG format you lose quality, but when compressed properly this is barely noticable on screen.
With Photoshop you are giving several options to make a JPEG look well, while still retaining a small file size.
If you are scanning your images, you should scan your photographs / images in a high resolution (150 - 200 dpi is optimal) and then reduce the resolution to 72 dpi in Photoshop. Go to Image > Image Size. A dialog box will appear, and in there you can specify 72 pixels per inch. This method helps maintain a nicer image quality, paticullary for those with lesser quality scanners.
The final file size of all images for the internet should be less then 40 K. This size usually maintains a resonable load time without sacrificeing quality. If you cannot get it under 40 K, then you should consider chopping the image up. The same image chopped up into smaller pieces will load faster then if it is in one big clump anyway.
Saving For The Web
When you finally have your image ready to be saved, you should go to file > save for web (shortcut key: alt+shift+ctrl+s). This will bring up a new dialog box.
The screen that appers will give you a number of options. First, you should select the 2-up tab. This will allow you to compare the origenal file with the final version.
On the right side, near the middle of the dialog box you should see an option that says settings. Choose JPEG High (or any JPEG really).
The main options that you should focus on now is the image quality, and progressive. If you check progressive the file should download in stages. It will fill in every other line, then return to the top and fill in the rest. I usally keep progressive unchecked.
Now you can begin to optimize your image. Check optimize, and click the quality option. This will present a slider that allows you to adjust the quality of the image. Natually highest is best, but you need to keep an eye on the file size. If it becomes to large download time will be unresonable.
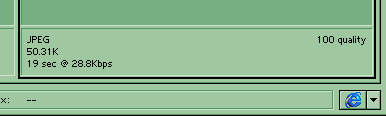 While you're adjusting the image, you can look underneath the right image, and see a bit of information.
The file size of the final product is loacted where it says "50.31 K" in the image on the right. Where it says 19 sec @ 28.8 Kbps is the estimated download time for the image. To see addtional download rates, right click on that area and you can choose from 9.6 to 256.0 Kbps.
You will also notice the Internet Explorer symbol on the right image. If you have a browser on your computer, there should be one loaded there, and you can click on it to open the final product in that browser, giving you a better idea as to what the image will look like.
When you are done you can press OK to choose a place to save your file.
Examples
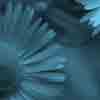
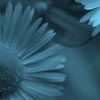
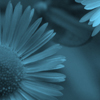
| 0 Quality | 50 Quality | 100 Quality |
 |
 |
 |
 Main?
Main?